

Do you find yourself repeatedly typing the same set of email addresses for team updates or project announcements? Manually adding recipients is not only time-consuming but also prone to errors. If you want to learn how to create an Outlook email distribution list, you’re in the right place.
Fortunately, Microsoft Outlook offers a powerful, built-in solution: the distribution list. This guide will provide you with a simple, step-by-step walkthrough on how to create an Outlook email distribution list for Windows, Mac, and the web.
What is an Outlook Distribution List?
An Outlook distribution list, also known as a contact group, is essentially a single email address that represents a collection of individual email addresses. When you send a message to the group’s address, it is automatically delivered to every member within it. According to Microsoft’s official documentation, “Contact groups, or distribution lists, are a fast way to send a message to multiple email recipients, especially groups you repeatedly contact.”
This is perfect for teams, departments, project groups, or any set of people you email regularly. Learning how to create an Outlook email distribution list is a fundamental skill for boosting productivity and ensuring clear communication.
What You’ll Need Before You Start
To ensure a smooth process, you need to have your contacts ready. Ideally, all the individuals you want to include should already be saved in your Outlook contacts.
If you are planning to create a large list, for instance, for a big department, we highly recommend having your contacts organized in an Excel spreadsheet. This preparation will make the process of how to create an Outlook email distribution list much faster, especially when we use the bulk import method later on.
How to Create a Distribution List in Outlook on Windows
The process for the Windows desktop application is straightforward. Consequently, you can have your first list set up in just a few minutes.
Step 1: Open Your Contacts
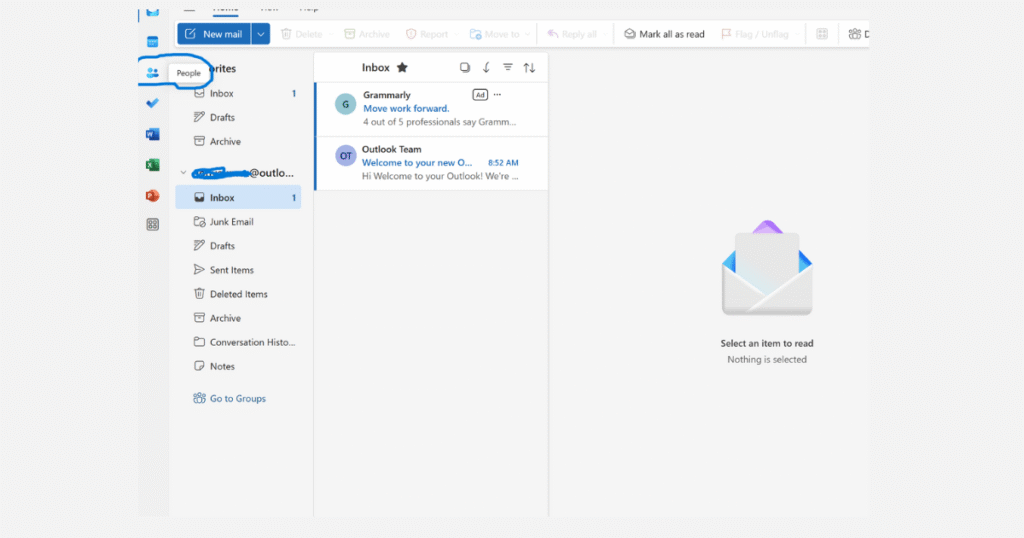
Click on the People icon at the bottom of Outlook to open your contacts.
Step 2: Start a New Contact Group
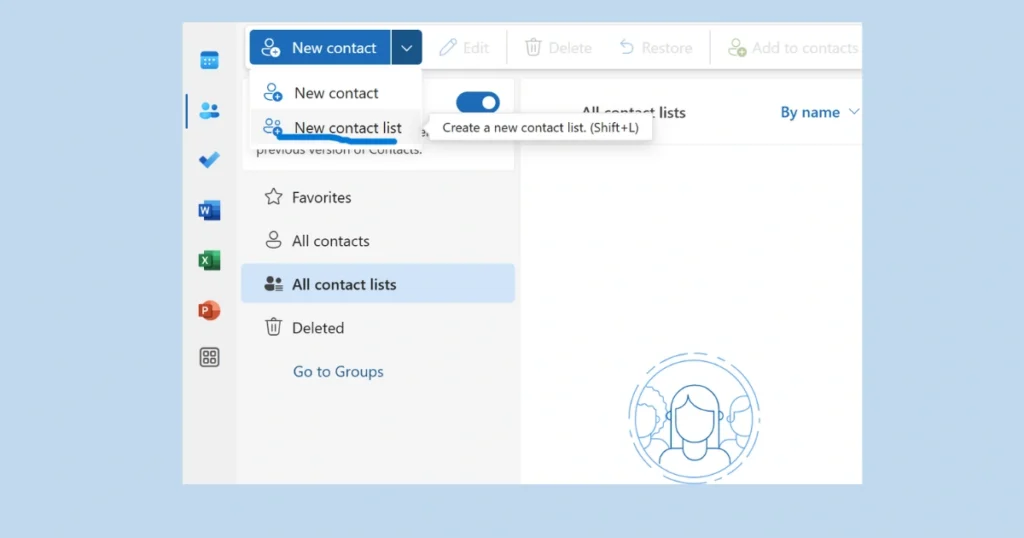
Click the New Contact Group button on the Home tab.
Step 3: Name Your List and Add Email Addresses
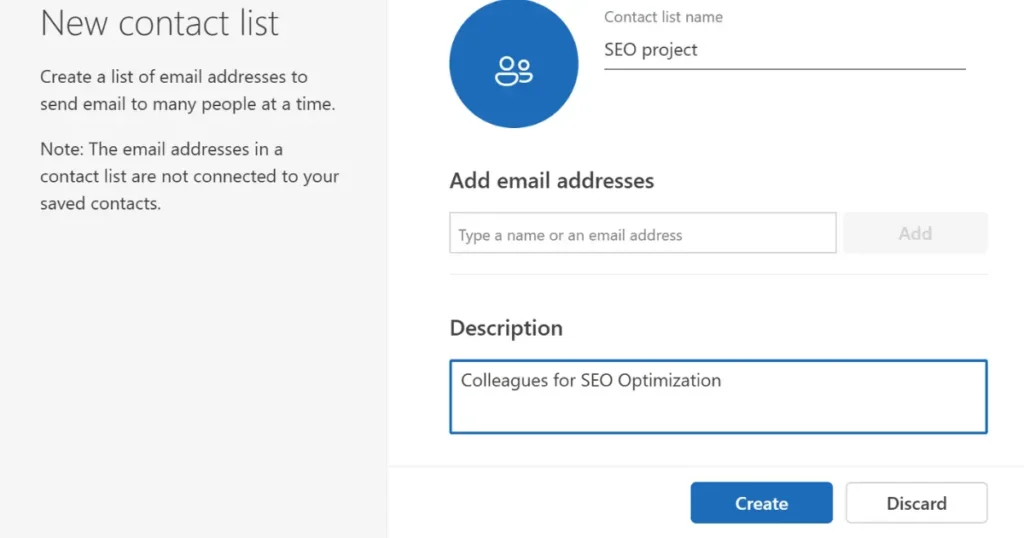
Give your list a clear Name (e.g., “SEO-Team”).
type or paste the email addresses you want to include.
You can add a description in the Notes field if needed.
Step 4: Create and Use Your List
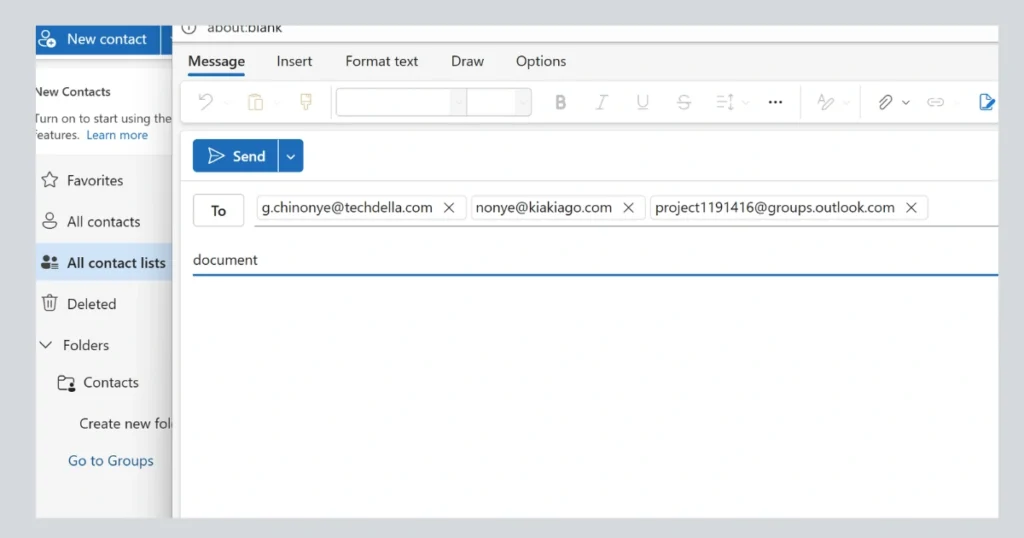
To use it, start a New Email.
In the To… field, type the name you gave your list (e.g., “SEO-Team”).
Important: Before sending, click the small plus sign [+] next to the group’s name. This will expand the list and show all the email addresses, allowing you to double-check that everyone is correctly included.
Write your email and click Send.
Congratulations! Your distribution list is now ready to use
How to Create an Outlook Email Distribution List on Mac (Using Contact Groups)
For Mac users, the feature is known as a “Contact Group,” but it functions identically to a distribution list. The steps are similarly simple.
Step 1: Navigate to the File Menu
Open the Outlook application on your Mac. From the top menu bar, select “People.”
Step 2: Create a New Contact Group
In the dropdown menu, select “New Contact Group.” A new pop-up window will appear for your group.
Step 3: Add Members and Save
Click the “Add Members” button and choose “From Outlook Contacts.” Select your desired members, give the group a name, and click the “Save” button to finish creating your Outlook contact group.
How to Create a Distribution List in Outlook from Excel: The Bulk Import Method
If you have a long list of contacts, adding them one-by-one is inefficient. Therefore, learning how to create a distribution list in Outlook from Excel is a major time-saver. This method involves importing your contacts first.
Step 1: Format Your Excel Contact List Correctly
Ensure your spreadsheet has clear columns like “First Name,” “Last Name,” and “Email Address.” This clean formatting is crucial for a smooth import.
Step 2: Save Your File as a CSV
Go to “File” > “Save As” in Excel. Choose a location and, most importantly, select CSV (Comma Delimited (*.csv)) as the file type. This is the format Outlook’s import tool requires.
Step 3: Use the Outlook Import Tool
In Outlook for Windows, go to “File” > “Open & Export” > “Import/Export.” Select “Import from another program or file,” choose “Comma Separated Values,” and browse for your CSV file. Map the fields correctly and import into your Contacts folder.
Step 4: Create the Group from Your Imported Contacts
Now that your contacts are in Outlook, follow the standard steps outlined in the Windows section above to create an Outlook email distribution list using the newly imported contacts.
Outlook Distribution List Best Practices for Easy Management
Simply creating a list isn’t enough; managing it well is key. With research showing that 87% of brands consider email marketing critical to business success, adhering to these Outlook distribution list best practices will prevent future headaches and maximize your communication effectiveness.
Best Practice 1: Use a Clear Naming Convention
Choose a name that instantly identifies the group’s purpose (e.g., “Executives-Board-List” or “Client-Newsletter”). Avoid vague names like “Email List 1.”
Best Practice 2: Perform Regular Member Audits
Schedule a quarterly review to add new members and remove old ones (like departed employees) to keep the list current and avoid failed deliveries.
Best Practice 3: Understand Sending Permissions
In a business environment, consider who really needs the ability to send messages to large groups to avoid spam. You may need IT help to restrict permissions.
Best Practice 4: Know When to Use an Alternative
For large, dynamic teams that need to collaborate, a Shared Mailbox or Microsoft 365 Group might offer more robust features than a simple distribution list.
How to Share an Outlook Distribution List with Colleagues
You’ve built a useful list, and now your teammate needs it. Luckily, you can easily share your Outlook distribution list with colleagues.
Step 1: Locate the List in Your Contacts
Go to your Contacts view and find the distribution list you want to share.
Step 2: Forward the List as an Outlook Contact
Right-click on the list name and select “Forward Contact” > “As an Outlook Contact.”
Step 3: Your Colleague Imports the List
A new email will open with the list attached as a .vcf file. Send the email. Your colleague can simply double-click the attachment to add it to their own contacts.
Related Tip: Creating Email Lists in Gmail
If your team or business also uses Gmail, you might find it helpful to know how to build contact lists there as well. Here’s a detailed guide that walks you through the process — from setup to sending: How to Create an Email List in Gmail
Conclusion
By leveraging powerful methods like importing from Excel to create a distribution list in Outlook from Excel and following essential Outlook distribution list best practices, you can ensure your lists remain efficient and effective.
Frequently Asked Questions
A Distribution List is simply a list of email addresses. A Microsoft 365 Group, however, includes a shared mailbox, calendar, a workspace for files in SharePoint, and more. It is designed for collaboration, while a DL is designed for one-way communication.
Ensure you are in the “People” or “Contacts” section of Outlook. If you are in the Mail view, the button will not be visible. Also, confirm you are not using the “Outlook for Web” interface in your browser, which has a slightly different layout.
Yes, but indirectly. You must first add all the email addresses from the thread to your Outlook Contacts. Once they are saved as contacts, you can then add them to a new distribution list.
Yes, if you are using a Microsoft Exchange or Microsoft 365 account, your contacts and distribution lists will sync across all devices where you are logged into Outlook.